My tutorials cover the basics about carving a Hitty. My methods for carving a turned Hitty are probably different than others, but these are the methods I use, and I hope that they are useful to site visitors.
Here’s a photo of the Hitty I carved to create the tutorials, after she has been pegged, painted, sealed and dressed. Her name is Hitty Herald, and she is now the official Hitty Herald mascot. She will be sharing many fun adventures with site visitors in the future, as well as helping me with future patterns and projects. She has a lot of fun in store for site visitors in the future, she wanted to say that the fun has JUST BEGUN!
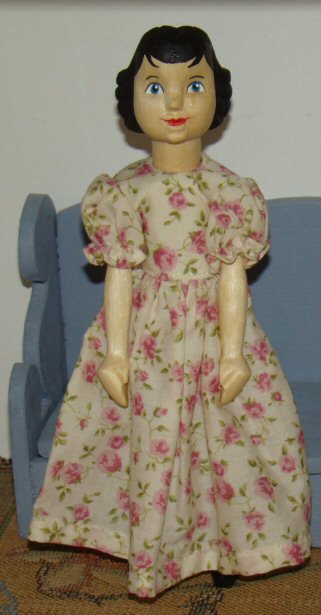
I hope that you find yourself able to carve a sweet precious Hitty of your own, and I hope the tutorials can help you. If you get discouraged, don’t worry, you can find a lot of help and advice if you become a member of hittygirls! Hitty Girls is a yahoo group run by our listmom, Julie Old Crow. The group is full of many wonderful members who are willing to share expert advice, tips, and help as well as offer words of encouragement that is Hitty related.
And best of all, The Hitty Girls group is full of wonderful people who are not only willing to play, they share their Hitty play with the whole group!
The Hitty Girls main site is located at HittyGirls.com
Click here to join the group, don’t be shy, come on out to play!
If you wish to learn more advanced carving methods, there’s also a free tutorial provided by Sara Cole that covers carving the face in more detail.
Sara’s free tutorial is located at
http://www.practicalhitty.com/tutorials/carve07/carve07.html
Sara also shares photos for painting inspiration at
http://www.practicalhitty.com/newsletter/Jan06issue/tutorialpaintgallery.htm
TC Vollum also offers a free tutorial online on how to carve a Bitty Hitty. Although the tutorial is for a Bitty, her instructions can also be used to get better detail on a regular size Hitty.
TC’s tutorial is located at
http://xsw.com/Hitty/Challenge/
Jean Lotz also offers some wonderful information on her website about carving and finishing wooden dolls. Ms. Lotz is also a Hitty carver, and her selaing methods can be used to seal a Hitty.
I use Tung Oil to finish my Hitty’s, following Ms. Lotz method for using tung oil as a finish. Her information is located at:
http://dollmaking.lotzstudio.com/lmakjdl.html
I did not do a tutorial on how to paint a Hitty, because the methods I use for the most part are not my own. I took an online class offered by Gale Lyons, in which she shared her painting techniques with those of us who took the class.
Gale now offers her instructions on CD, and as one who took the class, I can highly recommend her lessons. She explains advanced carving methods, as well as wonderful painting instructions!
If you’re interested in Gale’s lessons, email her at the email address below the CD image below to contact her.

And finally, below I share an email I sent to someone who had emailed me about how to peg a Hitty. This is the method I use for pegging my Hitty’s, other carvers methods may vary.
With these resources, you should have no problem learning more techniques to better your carving style and skill. When you finish your Hitty, if you would like a photo of her to be placed on the site, just send me a photo and I will gladly show your work! You can reach me by contacting me at the contact page located at : https://hittys.com/contact-us/
Now for instructions on how to peg your Hitty. My turned blanks are pre-drilled with 3/16 holes, so you will need a 3/16 size dowel.
I find a 3/16 dowel that is a tad over 3/16. I have found when it says 3/16 on the dowel, it can be a smidgen under or a smidgen over. I take an uncarved leg with me, and try to insert the dowel in the leg. If it slides on too easily, I don’t get that dowel, it’ll be too loose and will make a Hitty “flop” down and fall. If it doesn’t fit the hole then I buy it.
When I get the dowel home, I cut it into 3 inch pieces for the legs, 3 1/2 inch pieces for the arms. Then I set these aside. When I am carving a Hitty, I use a “loose” dowel to hold the pieces together as I work to be sure everything matches as close as I can, the hips, the arms to shoulders etc.
Once she’s done, I get the tighter dowels and carefully sand them down until they fit tight, but not too tight. If I sand them too loose, I throw them in the “use for something else” bag.
Sometimes I have to put the cut dowels in my small drill, and rotate them and sand them down that way. I place at least an inch in the drill, they are big enough where the inch is cut away anyways.
Once I have the dowels where they fit well, I glue on an arm and leg (the right side with Hitty facing you, the arm on your right and leg on your right) by simply painting wood glue on one end of the dowel and sliding the arm and leg to the end where the area is glued. I let these dry well before putting the dowel in the Hitty.
Once the glue is dry, I insert the leg dowel first, glue the second leg (paint glue near the body, not much glue, but enough to hold it well) , then sit Hitty down so that it spread the legs where she can sit comfortably. If you put them up close to the V, she can’t sit. Then stand her back up, make sure the legs are straight, and using a damp paint brush, paint away any glue on the inside that may have gotten pushed up to her body, being caeful not to move the legs.
Sit her down again to be sure they are straight and didn’t move, then let that dry. If you used too much glue, just keep working the legs to be sure that any glue that may have gotten in the body hole, doesn’t dry glueing the dowel in place where the legs can’t rotate.
Once the legs are dry, cut the dowel on both sides, then sand down. I use my dremel to cut the dowels, but some carve the dowel away with a knife. The dowel pieces should be flush with the legs. To better secure them, I paint some glue on the outside, over the dowel, so glue can be painted into what little space is left to make them more secure, then I wipe off with my fingertipe and then rub gently with a very damp q-tip.
Next I put the arm in the top body hole, glue the second arm on, and leave a tiny space between the arms and body, so dresses will fit better, and also so that when I glue the second arm, I can fit my paintbrush in the area by the body, to get the glue off the body and dowel that was pushed out of the arm hole.
I also work the arms the same way I do the legs, not moving them all the time, but moving them every 30 seconds or so until the glue dries, to be sure the dowel isn’t glued permanently to the body, when that happens, it’s a mess to undo.
I then cut the dowels, sand flush with arms, paint a tiny amount of glue into the cracks, wipe, clean with damp q-tip, all done, she is now pegged 🙂