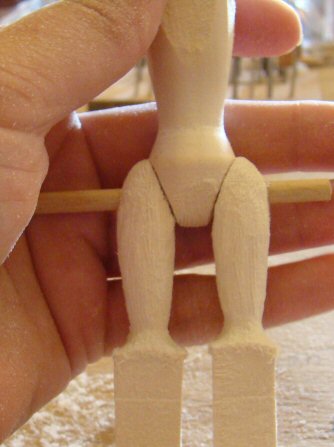
Carving the legs and arms consists mainly of “rounding” your blanks. There’s some shaping involved, but mostly it’s removing and rounding the “bulk” areas using a series of angled cuts.
To carve the upper leg, first take a ruler and measure exactly 1 1/8″ from the bottom of the peg hole. This is where the “knee” will be placed.

We’ll be using the rough cutter shown in the illustration below to do the bulk of the carving.
CAUTION: This cutter removes wood FAST, and removes SKIN even faster! Use a light touch, and BE CAREFUL. One doesn’t need to use a lot of pressure when using this cutter on soft wood like basswood. If you press the cutter too hard then you’ll go right through your blank within seconds, which can result in slippage onto your fingers or hands. BE AWARE, cuts from this cutter are NASTY (don’t ask me how I know, just see if you notice any scars as you view the tutorial images, both on my fingers and my carving board lol).
Respect this cutter, view it as a mini Chainsaw type cutter on steroids!

Using the cutter, carve a groove across the line you marked for the knee, being sure that the middle of the cutter is the section right on top of your mark.

Now to be sure that both knees are of the same height, place both legs on a dowel and hold them together firmly. Your first cut is your “marker” so you can “eyeball” to see where the next cut goes.

Now Carve across the back of the legs being sure to keep your cut straight and even with your previous cut.
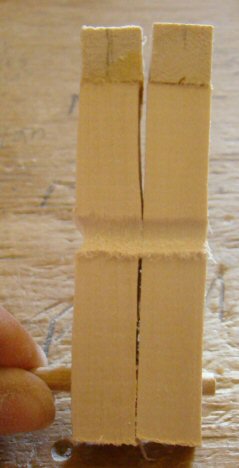
Now cut another groove, across both legs, on the Front of the legs. Once this cut is finished, remove the legs from the dowel and cut the side grooves.

Here we see the first “knee” is marked all around.

Next, round off the marked area by gently running the cutter around the area to clean up the sharp edges.
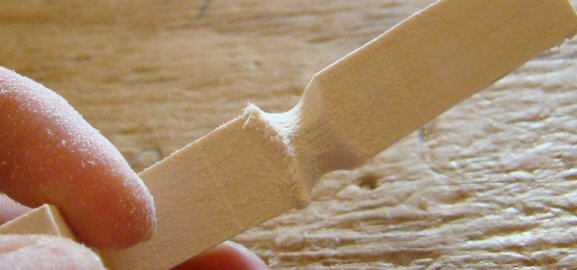
Next you’ll be cleaning the corner edges above the cut. The illustration below shows how to make the cut, basically start your cutter right at the bottom of your peg hole, and “Angle” it down to where it meets the knee in a smooth pattern.

You’ll want to carve all 4 corners at an angle, then the middles so that your square leg is now rounded.
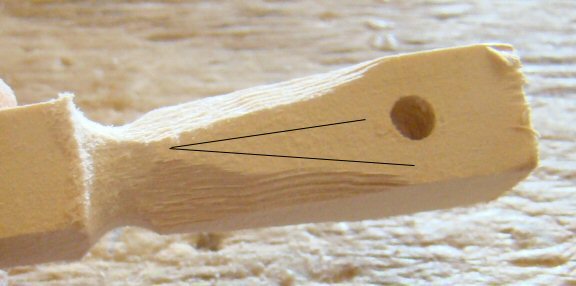
Gently smooth any sharp corners after you have cut the corners and middles.

Here’s an illustration showing how your upper leg should look now.
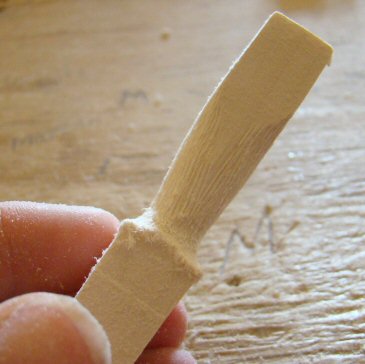
Next, you’ll want to carve the knee down to proper Hitty size by gently carving around the knee until it’s as small as you wish it to be. Remember, the pieces will need sanding, so don’t cut it too small or you will end up with very tiny and very delicate Hitty limbs.

Once the knee is carved to size, carve angle cuts all around the leg to make the upper leg smaller by starting at the top, right below the peg hole, and bringing the cuts down all around.
This cut should come from the top, to right below the peg hole.

Next you will want to cut the top of the leg at an angle on ONE side only. This will be the side that joins with the V-Joint on the body.

Once you have angled the upper leg, place it on your Hitty’s body (using a dowel) to see how it fits.
Notice the arrows below. The bottom does not fit flush with Hitty’s body. This means the angle needs to be steeper at the top. When fixing an angle like this, I usually carve just the top part only until it fits against Hitty’s body better.

Here is the leg after carving the top again. The joint still is not as flush as I like it, but it’s close enough to where I can now gently cut the angle a tiny bit more to make it fit better.

Here the angle fits perfectly. I also brought the cut down more to where it is more flush with the bottom of Hitty’s body. It’s not exactly flush because later we will round off the bottom of Hitty’s body more, so that she will be able to sit better.

The top of the leg extends too far above Hitty’s hips. Place the leg on the body, and mark the top of the hip on the leg blank with a pencil.

Here’s my blank with the marking.

Using the same cutter, gently carve the excess wood away. If your cut isn’t even don’t worry about it, you’ll be rounding this area soon. Be SURE to not go past your pencil line.

Now place your leg back on a dowel and join it with your Hitty. Here you can see that the top of the leg is just a smidgen over the hip line, this is to give “sanding” excess when it comes time to sand the leg down.

Now that you have your leg fitted to your body, you’ll want to round the outside of the leg by carving away the corners.

Here is a photo to show that one corner has been cut, the other will be cut next.

Now gently run your cutter around the outer part of the leg to round everything off.

Next you’ll be rounding the top of the leg by carving away the two top corners.

Here’s my leg rounded. NOTE: When rounding this section, do NOT carve away any wood from the middle. Remember this is the section that meets the hip line. If you will notice the top of my leg, the middle is “flat” a bit on top, only the corners have been rounded. This flatness will be smoothed out later when sanding.

Now you will want to round off the side away from your V angle cut. To do this, gently carve away the sharp edge, then round gently until it is of the shape you wish it to be.

Here’s a photo to show the shape the upper part of the leg should be once rounded.
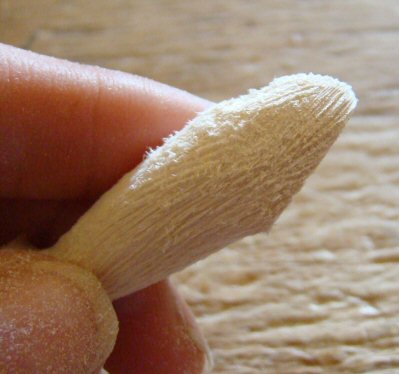
Place your leg on your body again, and be sure that everything fits flush. The Leg V should fit flush with the body V, the top of the leg should be even with the hip and everything should flow down smoothly to a tiny knee.
The final step will be to sit your Hitty down, with her leg still attached and see if she “wobbles”. If she wobbles due to the bottom of her V joint being longer than the width of your leg, then you’ll want to round off that area some more until she can sit without wobbling.

Next carve the other leg, being sure to reverse the angle cut to match the V-Joint.
Here’s a photo of my Hitty’s upper legs at the completion stage. Notice both legs fit the V-joint well, both meet the hip line, both round out to tiny knees and when seated, the Hitty doesn’t wobble. Notice her “crotch” is a bit wider in this photo than the above photo. This is the result of me rounding out that area to make it where it Hitty doesn’t wobble (due to this area being too long) when seated.