If you’re new to carving Hittys, then you may find yourself struggling with the same problems I had when I first started learning to carve Hitty.
One, I had no Hitty of my own to use as a reference for size.
Two, I found it very difficult to round certain areas where all areas were carved in harmony. My neck would be a bit off from the waist, the hairline would be too thick on one side. I’d have to carve away to try and get the waist, neck, head centered, and then try to get the body to still “look right”.
And to top it off, I was also trying to learn how to sew for Hittys, and was getting very discouraged when my dresses didn’t fit after following patterns others had shared with other Hitty fans in the Hittygirls group. So I tried making my own patterns, which resulted in more frustration.
I would participate in swaps and receive beautiful dresses in return, but none of the dresses would fit Hitty Dot (Also shown in the photo below).
I finally got to where I was able to sew dresses for the Hittys I was carving, including Hitty Dot (she is also in the photo below) and was pretty pleased with my results. By this time I had sold some Hittys on eBay, and all my buyers were happy with their purchases, so I thought I was doing everything right and proper.
That was until I acquired Hitty Pershing, my Langton Hitty (also shown in the photo below).
When Hitty Pershing arrived and joined the Merry Happy Hittys family, I was stunned. She was so delicate and “fragile” looking when compared to Hitty Dot and other Hittys I had carved.
I realized that one, the dresses were not fitting my Hitty’s well because their bodies were way too big. Two, the shoulders of the dresses were narrow, and my arm shape was way off base. Three, my hands were too big, four, my legs were huge, and five, the neck did not have “sharp” edges at the shoulders, resulting in dresses not being able to “snap” properly.
I started carving my Hitty’s smaller, and started working on improving my carving skills in the “trouble” areas, but I still found it difficult to keep the waist, neck, head, hairline areas even. Over time I got better and better where it became easier to work in those areas, but when I got my lathe and a friend suggested I consider turning a Hitty, I decided to give it a try.
That’s what began the “Turned Hittys” series I now carve. These Hittys are separate from my carved Hittys, simply because the body, neck and head is turned on the lathe, where very little work has to be done to shape the blank into a proper Hitty shape.
The bodies are already turned down to the proper size where the Hitty will be able to wear Hitty dresses sewn by others, or sewn using one of the many patterns provided online by the generous members of the HittyGirls group.
The waist, neck and hairline is already shaped and in line properly with each other. The neck has the sharp edge for a perfect collar fit.
I really enjoy carving turned Hittys, both with a dremel and with a knife. The areas that were most frustrating for me, are solved because those areas are turned before I begin carving.
Then I can focus on the areas that are most fun for me. The legs and arms, and of course, the style of curls and the sweet face.
The carving tutorials focus on carving a Hitty from a turned blank because they are geared towards beginner carvers. Advanced carvers will probably not find much useful information in them.
If you desire to have a Hitty, but think you can’t carve one, don’t give up! You can! You can follow these tutorials using any blank of your choice, or you can order a turned blank. If you’d like to purchase a turned blank, you can contact me via the contact page. Click here to contact me.
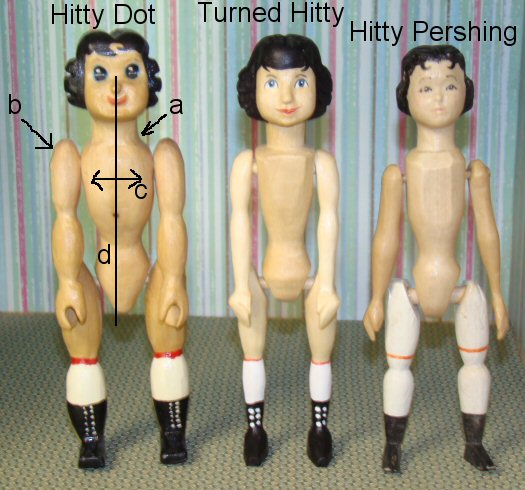
Below is an illustration showing the areas I was talking about as being my “problem” areas.
Compare Hitty Dot with the Turned Hitty and Hitty Pershing.
Point A shows the neck, it doesn’t have a “sharp” line which made it very difficult for dresses to snap properly.
Point B shows the arms, they were not shaped properly for dressing at all!
Point C shows the width of her chest. This is the most important area to size, if the chest is too large, the smaller dresses will not fit enough to where you can even attempt to snap the back.
Point D shows the line down her body. Notice it starts in the center of her nose, yet by time it gets to the waist and V-Joint, it’s no longer centered.
The Turned Hitty has a body more like Hitty Pershings, with a sharp neck, centered waist and neck, nose centered (As best as possible) once carved as I show in the tutorial and chest of the proper size to fit any proper size Hitty dress, no matter who sewed it.
Here’s a photo of a turned blank. This is the blank I will be using in the tutorials. The feet are pegged like the original Hitty’s feet, the neck is already completed, the body and V-Joint needs just the tiniest bit of shaping, and the hairline is done although the top of the head and bottom hairline still needs to be shaped.